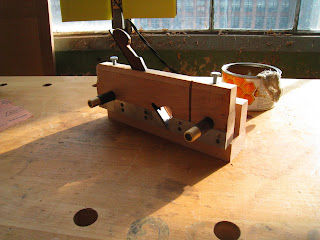
There are two basic functions that are critical to the proper operation of this plane. The fence needs to guide the cut, and the plane needs to make the cut.
The fence must reliably reference off of the end of the board. A lot of the most obvious work to date has been to accomplish this. The last remaining piece required to make this work is to drill holes in the body of the plane to install some wooden pieces to clamp against the arms of the fence, and some brass inserts, to allow the thumbscrews to drive those wooden pieces down. I used a dowel centering jig, some long brad point bits, and some stop collars to accomplish this.
The cut will be made in two steps: The nicker will score the wood ahead of the blade, establishing the shoulder, and the blade will plow out the waste. To do this properly, the nicker needs to be aligned with the side of the plane, the blade also needs to conform to the shape of the body, and the throat needs to allow the waste to clear. The nicker will be covered in the next entry.
To shape the blade, I needed to know where the edges needed to be. Because the sole used to be square, and because the sides of the plaen used to be wider, there was a lot of shaping that needed to be done. I coated the back with black magic marker, and scribed with an iron from a block plane. I used an 8" slow speed bench grinder to get close to the line, and finished up with a wet grinder. I started with the bench grinder because it's fast. I switched to the wet grinder because the blade comes to a point, and I didn't want to burn the temper out of the blade.


No comments:
Post a Comment